Begin by assembling the Letters to Santa Mailbox. Unlike in this picture, do NOT add the door to the front quite yet.

Unroll a Yellow Fadeless® Paper Roll colored side down on a hard floor and place the mailbox on its side on top of the paper. Trace the outline of the mailbox with a pencil. Slide the mailbox over and trace the same side again. Use scissors to cut out the shapes.


Unroll more paper and lay the mailbox on top of it again, this time placing it front side down with the legs facing the paper's cut edge. Roll the mailbox over from front to back on the paper. Pull the raw edge over the mailbox until you have a length of paper long enough to cover both the front and back of the mailbox. Cut the length of paper with scissors. Trim the paper all around the box leaving a one-inch border. Use tape to secure the paper to the mailbox as shown in the last two pictures here.

Use double-sided tape to secure the side panels to the mailbox, trimming the paper if necessary.

Use a craft knife to cut a hole where the mailbox door is. Leave about an inch border all the way around. Cut slits to each corner. Fold the flaps in and tape them to the inside of the box.

Attach the door to the box.

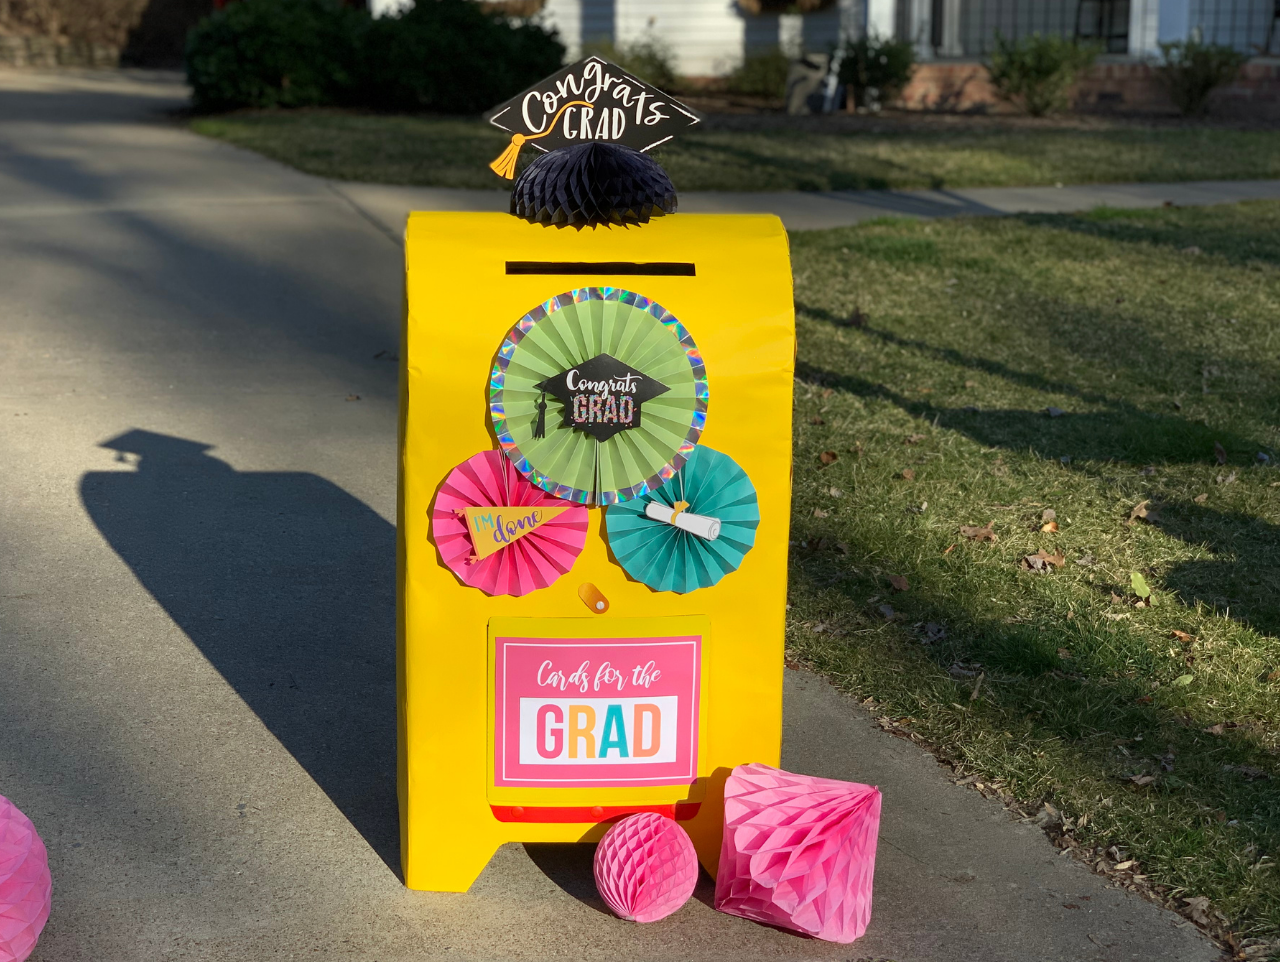
Print the "Card for the Grad" Sign from the coordinating printable collection. Use double-sided tape to secure it to the front of the door.

Repeat the same cutting process as the door above for the card slot.

Now it's time to jazz up the box for the celebration! Use poster strips to attach Congrats Girl Paper Fans to the box between the card slot and the door. Use another poster strip to attach a Graduation Mortarboard Honeycomb Centerpiece to the top of the mailbox.

Set the mailbox up at the end of your driveway by the street so that car passengers can easily reach it as they drive by. Place a few Pink Honeycomb Decorations at the base of the mailbox. Arrange the mailbox among a Pink Congrats Grad Letters Yard Sign, Grad Party Pennant Flags, a DIY Drive-By Graduation Favor Table, and a Personalized Photo Frame Prop Yard Sign for the ultimate "WOW" factor. Be sure to see the complete Drive-By Graduation Party here as well as the FREE Party Printable Pack!

Begin by assembling the Letters to Santa Mailbox. Unlike in this picture, do NOT add the door to the front quite yet.

Unroll a Yellow Fadeless® Paper Roll colored side down on a hard floor and place the mailbox on its side on top of the paper. Trace the outline of the mailbox with a pencil. Slide the mailbox over and trace the same side again. Use scissors to cut out the shapes.


Unroll more paper and lay the mailbox on top of it again, this time placing it front side down with the legs facing the paper's cut edge. Roll the mailbox over from front to back on the paper. Pull the raw edge over the mailbox until you have a length of paper long enough to cover both the front and back of the mailbox. Cut the length of paper with scissors. Trim the paper all around the box leaving a one-inch border. Use tape to secure the paper to the mailbox as shown in the last two pictures here.

Use double-sided tape to secure the side panels to the mailbox, trimming the paper if necessary.

Use a craft knife to cut a hole where the mailbox door is. Leave about an inch border all the way around. Cut slits to each corner. Fold the flaps in and tape them to the inside of the box.

Attach the door to the box.

Print the "Card for the Grad" Sign from the coordinating printable collection. Use double-sided tape to secure it to the front of the door.

Repeat the same cutting process as the door above for the card slot.

Now it's time to jazz up the box for the celebration! Use poster strips to attach Congrats Girl Paper Fans to the box between the card slot and the door. Use another poster strip to attach a Graduation Mortarboard Honeycomb Centerpiece to the top of the mailbox.

Set the mailbox up at the end of your driveway by the street so that car passengers can easily reach it as they drive by. Place a few Pink Honeycomb Decorations at the base of the mailbox. Arrange the mailbox among a Pink Congrats Grad Letters Yard Sign, Grad Party Pennant Flags, a DIY Drive-By Graduation Favor Table, and a Personalized Photo Frame Prop Yard Sign for the ultimate "WOW" factor. Be sure to see the complete Drive-By Graduation Party here as well as the FREE Party Printable Pack!


